
Create dynamic, responsive user-interfaces effortlessly with WebIQ
.webp?width=703&height=460&name=Product2---703x460%20(1).webp)
Create dynamic, responsive user-interfaces effortlessly
.webp?width=2465&height=834&name=webiqtopheroimage%20(1).webp)
100% web based
Low code
Fully responsive
Open platform
Continuous improvement
Edge-based system
Sign up and experience WebIQ today!

Our Made-To-Order Success Services


WebIQ Onboarding
The most basic packages is suited well for small projects.
- 1 hour technical WebIQ training
- 1 hour WebIQ design training
- 1 hour support for ad-hoc questions and development
€ 390
WebIQ Accelerator
Gets you up and running as soon as possible even for more complex HMI systems.
- 3 hours technical WebIQ training
- 3 hours WebIQ design & layout training
- 4 hours support
€ 1300
WebIQ Complete
To get the full scoop we have to offer this is the package you should choose.
- Technical analysis
- Web HMI development
- HMI integration into automation (PLC connectivity)
- WebIQ training and ongoing HMI support
- UX analysis
- Interaction design
- Graphical design
- Design support
Price by quote
More Comfort Thanks To WEBSeason

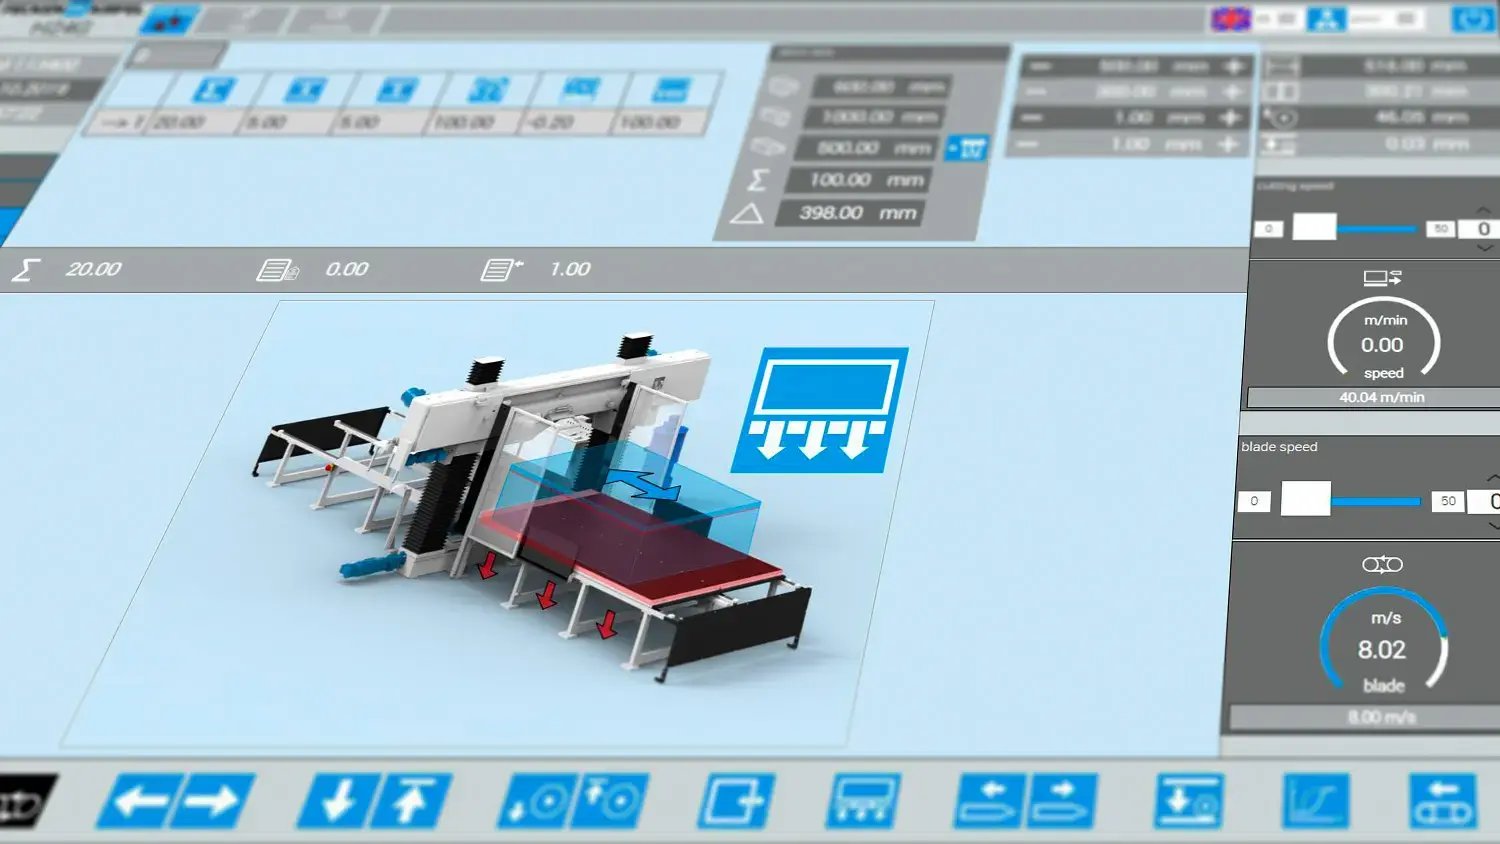
HMI Optimization With WebIQ
Platforms
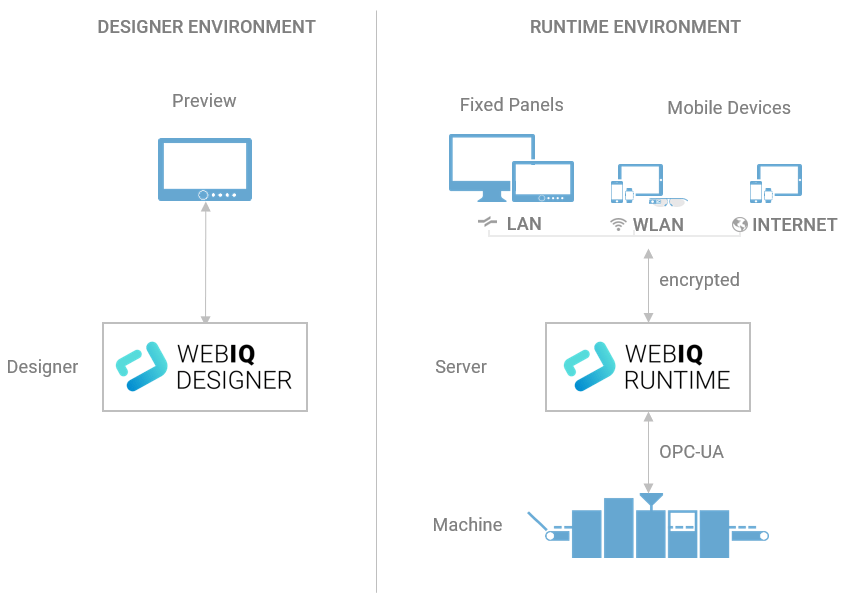
WebIQ is available on these platforms – WebIQ Designer is the engineering tool offering WYSIWYG editing without programming knowledge for creating your HMI and is currently available for Windows only.
| Windows (x86/x64) | Linux (x86/x64) | Raspberry Pi* | Docker | Linux (ARM)** | |
| 32bit | |||||
| 64bit | |||||
| WebIQ Runtime | |||||
| WebIQ Designer | − | − | − | − |
* Only Raspberry Pi OS is officially supported. When using Raspberry Pi also for the display of the HMI at least 2 GB of RAM is required.
** As ARM is only a processor platform it cannot be officially supported on all systems and depends on a number of factors. You can try using the Raspberry Pi versions – if you are unable to get them working on your ARM system please feel free to contact us for help!
** As ARM is only a processor platform it cannot be officially supported on all systems and depends on a number of factors. You can try using the Raspberry Pi versions – if you are unable to get them working on your ARM system please feel free to contact us for help!
Protocols
Proprietary protocols are not our thing – therefore we fully focus on open standards allowing for flexibility and preventing vendor lock-in.
| Feature | Available | Notes |
|---|---|---|
| OPC-UA | Items, Methods, Timestamps | |
| Modbus | Via separate freely downloadable gateway | |
| MQTT | Via separate freely downloadable gateway | |
| Other protocols | Via a custom gateway or a custom IO Handler created by you or on request by us |
Technologies
Robust, modern and open technologies ensure future-proof investments and independence from the vendor.
| 100% web technology (HTML5, CSS, JavaScript) | |
| Legacy-free (built from the ground up with web technologies) | |
| Integrate open-source and commercial JavaScript and CSS libraries easily | |
| Create your own widgets using web technology | |
| Connect custom non-OPC-UA datasources via a custom IO Handler | |
| Essentially… you’re not dependent on us but can create your own libraries and widgets! |


WebIQ Designer Trial
Free 30 day evaluation
WebIQ Designer
Yearly subscription
WebIQ Runtime
One-time fee